

Computer diagnostics for malfunctions
 How to check the computer for malfunctions, test all components, identify problems and, if possible, fix it yourself.
Many PC owners face various errors and malfunctions in the computer, but can not determine the cause of the problem. In this article, we will consider the main methods of computer diagnostics that allow you to independently identify and fix various problems.
Keep in mind that high-quality computer diagnostics can take a whole day, select it in the morning specifically for this, and don’t start getting closer to evening.
I warn you that I will write in detail as for beginners who have never disassembled the computer in order to warn about all the possible nuances that can lead to problems.
You can download a brief instruction on PC diagnostics and other useful files in the “Links” section.
It is recommended to perform computer diagnostics in the order described below, since all actions are interrelated and it is undesirable to proceed to the next step without completing the previous one.
Content
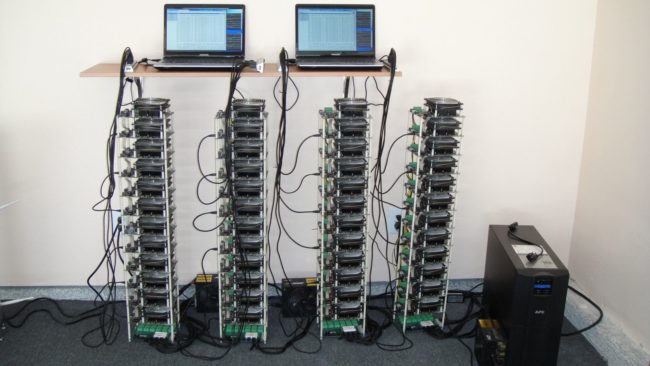
1. Dismantling and cleaning the computer
First of all, it is recommended to remove and thoroughly clean the main components of the computer, as often the cause of malfunctions can be dust or poor contacts.
When disassembling and cleaning your computer, do not rush; do everything carefully so as not to damage anything. Store accessories in a prepared safe place.
Before cleaning, it is not advisable to start the diagnosis, as you will not be able to identify the cause of the malfunction if it is caused by clogged contacts or cooling systems. In addition, it may not be possible to complete the diagnosis due to repeated failures.
Unplug the system unit from the wall outlet at least 15 minutes before cleaning, so that the capacitors discharge.
Disassemble in the following sequence:
Disconnect all wires from the system unit.
Remove both side covers.
Disconnect the power connectors from the video card and remove it.
Remove all memory slats.
Disconnect and remove the loops of all drives.
Unscrew and remove all discs.
Disconnect all power supply cables.
Unscrew and remove the power supply.
It is unnecessary to remove the motherboard, processor cooler, case fans, you can also leave the DVD-drive if it works normally.
Carefully blow out the system unit and all components individually with a powerful stream of air from a vacuum cleaner without a dust bag.
Carefully remove the cover from the power supply and blow it off without touching your electric parts and circuit board with your hands and metal parts, as there may be voltage in the capacitors!
If your vacuum cleaner does not work on blowing, but only on blowing, then it will be a little more difficult. Clean it well so that it pulls as hard as possible. When cleaning it is recommended to use a nozzle with soft pile.
Nozzle for cleaning
You can also use a soft brush to clean out the dust that has stuck.
Cleaning brush
Thoroughly clean the heatsink of the processor cooler, after examining where and how much it clogged with dust, as this is one of the common causes of processor overheating and PC crashes.
Dust-Cooled Cooler
Also make sure that the cooler mount is not broken, the clip does not open and the heatsink is firmly pressed to the processor.
Be careful when cleaning the fans, do not let them spin up too much and do not bring the nozzle of the vacuum cleaner close if it is without a brush so as not to beat off the blade.
After cleaning, do not rush to collect everything back, but proceed to the next steps.
2. Checking the battery of the motherboard
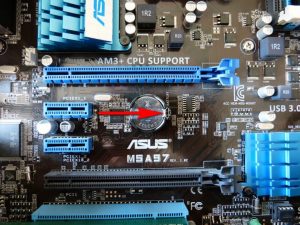
The first thing after cleaning, so as not to forget later, I check the battery charge on the motherboard, and at the same time reset the BIOS. In order to pull it out, you need to press on the latch with a flat screwdriver in the direction indicated in the photo and it will pop out.
Battery on motherboard
After that, you need to measure its voltage with a multimeter, optimally if it is within 2.5-3 V. The initial battery voltage is 3 V.
Battery Voltage Measurement
If the battery voltage is below 2.5 V, then it is advisable to change it already. The 2 V voltage is critically low and the PC is already starting to fail, which manifests itself in a reset of BIOS settings and stops at the beginning of the PC boot with a suggestion to press F1 or some other key to continue the download.
If you do not have a multimeter, you can take the battery with you to the store and ask them to check there or just buy a battery in advance to replace it, it is standard and very inexpensive.
A clear sign of a dead battery is the constantly flashing date and time on the computer.
The battery needs to be changed in a timely manner, but if you do not have a replacement on hand right now, just do not disconnect the system unit from the power supply until you change the battery. In this case, the settings should not fly, but problems can still occur, so do not delay.
3. BIOS reset
Battery check is a good time to completely reset the BIOS. In this case, not only the BIOS settings are reset, which can be done through the Setup menu, but also the so-called volatile CMOS memory
